
HIL Lab Kiosk & TAMS Program

The navigation menu for the HIL Lab Kiosk
A majority of my time working at GKN Driveline consisted of working on a system of software testing programs for the HiL (Hardware in the Loop) Lab team, who run tests on the software controlling many of the products made at GKN for many automotive manufacturers, mostly General Motors, by running the software in different scenarios looking for possible bugs or errors. To help with this, my manager and I came up with the design for what we call the HiL Lab Kiosk; a presentation and testing tool, made in WPF and programmed in C# and .NET. It is made to show off our capabilities, help the testers, and manage the storage and tracking of all tests performed by our engineers.
As seen above, this Kiosk program was split into several categories in order to maintain the ability to present what our team can do in an easy-to-understand manner; showing off basic things like the weather, the structure of our team, presentations and videos, and our HIL Lab Capabilities demo reel. In addition to these, the program also has helpful quality-of-life tools for our team, such as a site map which shows the locations of things like storage rooms, dining areas, conference rooms, and printers; as well as containing the testing tools only accessible by members of our team using their employee badge. The area in the middle is a slideshow of quotes, images, animations, and other descriptive media, showing off our abilities and what it is we do in this team.

HiL Lab Capabilities
The most recent program to be completed was the HiL Lab Capabilities demo reel, which is made to show off the products we test and how they work, allowing the user to include a video or demo program showing off the testing process and how the device works and display an image of it in a reel of up to eight different devices displayed on a 3D interactive conveyor belt. the images are displayed as billboard objects in 3D space, turning between devices when either the arrow buttons below the belt are touched or moving to the selected object when selected. The process of moving the components between each spot is a smooth animation of the components moving between one another, which had to be calculated and programmed out manually, which allowed me to develop an understanding of how 3D animation programming worked and giving me a chance to learn how to program it. A component can be added by a system admin and allows the user to input the title, description, image source file, and application file if needed, and allows the user to choose which components to show within the reel. These added components are then stored internally as an XML file.
GKN Interactive Site Map
This is the GKN Interactive Site Map, developed to allow employees to locate things like conference rooms, restrooms, eating and dining spaces, printers, and office supply storage areas. It was initially created as a powerpoint when the team was just starting, but many found it unwieldy to use, so I took it upon myself to upgrade it into WPF and make it more user-friendly, and many employees were very impressed by it, now to the point of having me expand it into a standalone program which can be used by the entire company.


HIL Lab Configuration Database & TAMS
The most important piece of work that I completed during my internship was what our team called the "Secret Set of Tools", which was a system made for tracking the setup and configurations of Lab Tests by creating a database of labels and configurations, tracked by QR codes, to keep a record of all tests being done so that we could track what tests have been run with a potentially faulty system, greatly reducing the time spent on retests and speeding up our process overall. Each configuration is assigned to one of eight test locations, recorded as "Test Benches" so that we know which location each test was done at, by which employee, at what time, and with what parts. This way each test issue can be easily addressed and fixed without the need to retest the entire software release. These configurations are made by scanning a label made for each test device used, stored as a QR code to easily and quickly scan each part being used in a test. These labels are then stored in a database via SQL, where they can all be indefinitely stored and tracked when needed.
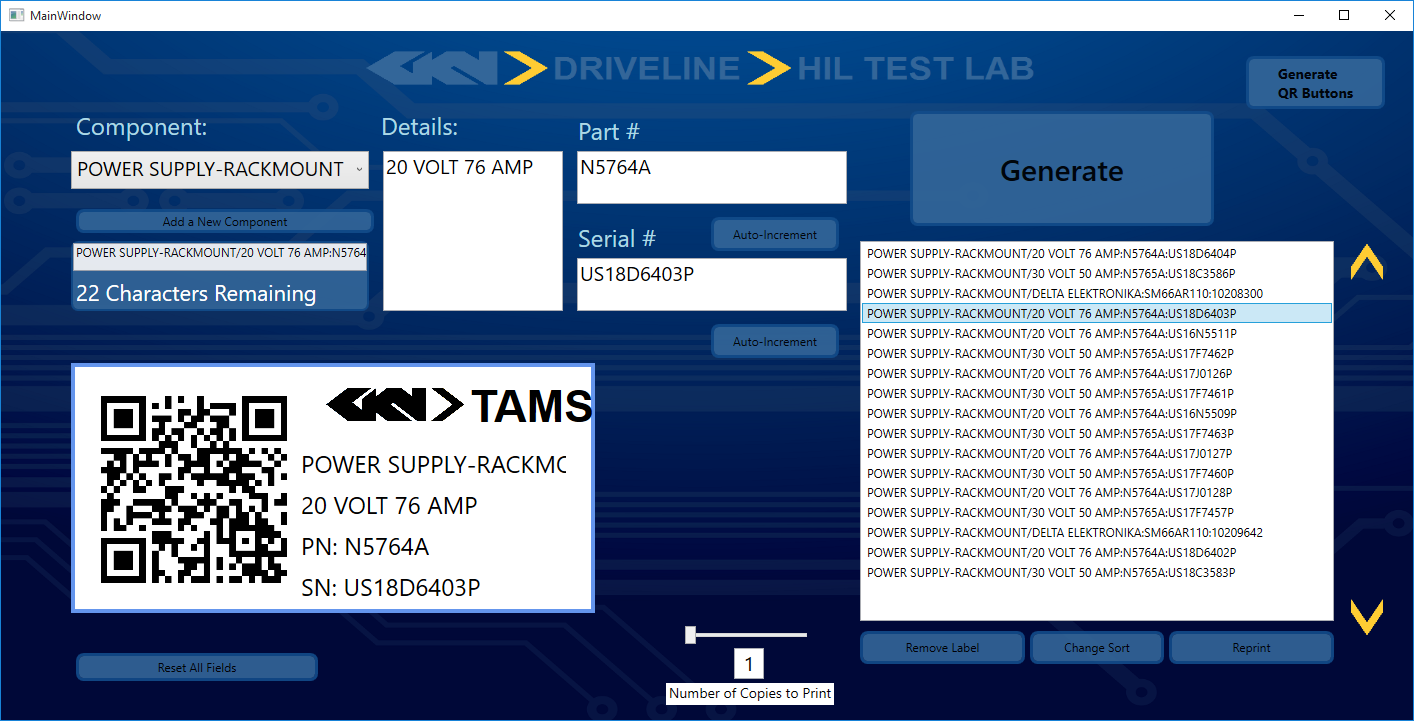
These labels are made in a program called TAMS (Test Asset Management System), where each part can be given the crucial details needed and from that the system automatically generated a corresponding QR code which can be read by the Test Tools program to know exactly which part is being used and how allowing for parts to be tracked and replaced when necessary without having to lose test data.